Wednesday, 10 November 2010

Trying Diva

I finally got around to trying the diva distribution of OpenSim. I followed the instructions available here, which actually weren't as complicated as it seemed at first glance. So long as you follow it step by step then it's pretty fool-proof. Although I've had previous experience with both OpenSim and an equivalent of MoWeS called XAMP, so I'd be interested to hear about other people's experiences.

One step that did look as though it could be a lot simpler was the setup of the MySQL server. My recommendation would be that at the point when you're choosing Apache2, MySQL5 etc in the MoWeS mixer (pretty much the first step in the instructions), that you also select PHPMyAdmin in the Application software section.

In step 1, after you get confirmation that Apache and MySQL is running, open a web browser and go to: http://localhost/phpmyadmin/

In the window that opens click on the Privileges tab (shown as 1 in the image).


Enter a User name of opensim, set a password (including retyping it), as shown in 2. Then select the radio button option to create a database with the same name, as shown in 3. That's it. No use of command prompts or typing in unfamiliar strings of text.


I've only had a brief play so far, but I'm looking forward to trying out the web interface and sending things flying around the Megaregion. My only concern was that I couldn't connect to it from another PC. Whether this is due to permissions or the hard-coded local IP I don't know. Hopefully the former.

Thursday, 14 October 2010

Running a LAN grid


I don't want to clutter this post with the background reasoning, but I would argue that the majority of educational uses of virtual worlds can be addressed by running 1 student per grid, or ad-hoc multi-user set-ups. The second of those seems to be a lot easier now than the last time that I tried it.

The instructions in this post will allow you to set-up a loca
l OpenSim grid, for use within an institution's firewall. You can walk into a lab, start the server on one PC, and have the students connect to it through other PCs.

Server setup:
  1. Download OpenSim and run it once in order to configure it - as described here.
  2. You will need to use the 'create user' command to create an account for each student.
  3. Copy the 'bin' folder to a USB stick.
Running the server:
  1. Plug in the USB stick
  2. Run OpenSim.exe (OpenSim.32BitLaunch.exe on 64bit machines).
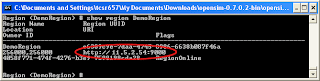
  3. **Update** In the OpenSim window, type: 'show region regionName'.
  4. Note down the text that starts with http://
If you've forgotten the name that you gave to your region, then it is shown in brackets within the OpenSim window, i.e. Region (regionName) #


Viewer setup:
  1. If you already have Second Life viewers installed then skip to the next bit
  2. Alternatively you can install a viewer on any PC, and then copy the viewer's folder from the 'Program Files' directory (typically on the C drive) onto a USB stick. The just run the executable in this folder.
You (or the students) will need to configure the viewers so that they connect to your server. If the server is run from the same PC each time, then you should only need to do this once.

Running the viewer (easy way):
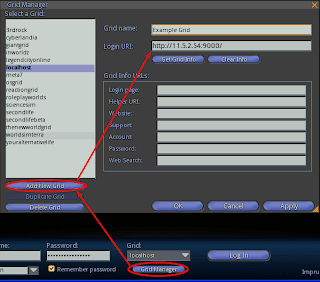
  1. Viewers such as Imprudence and Hippo include a grid manager where the ip address of the server can be added. Be sure to include 'http://' at the front and ':9000' at the end.

Running the viewer (slightly harder):
  1. Copy your existing shortcut to the viewer (assuming it's installed - if running from a USB right-click on the exe and choose 'create shortcut').
  2. Right-click on the new shortcut and choose 'Properties'.
  3. On the 'Shortcut' tab, look for the 'Target' option.
  4. At the end of the text in the 'Target' box add: '-loginuri http://11.5.2.54:9000/' where 11.5.2.54 is the ip address of the server.

There is of course a huge variety in networks and institutional setups, but hopefully these steps should work in most cases. You should consider involving your IT or eLearning department when trying to setup OpenSim in this way. They probably won't like running things from USB sticks, but their alternative might be a more robust system.

Wednesday, 13 October 2010

OpenSim commands


You can type commands into the OpenSim window. It can be a bit daunting if you are not used to 'command line' applications, and although there is a possibility that you might completely wipe everything that you've made, the chances of doing it by accident are very slim (hint: avoid any commands that include the word 'delete').

To list the available commands type: help
To create a flat terrain (taken from Roger Stack) type: terrain fill 21
If you're tired of being Test User type: create user firstname lastname
When you're finished and want to shut down type: quit

Note that permissions are ignored by default, so even if you login as a different avatar you will still be able to modify everything that's there. You won't have access to the other avatar's inventory though - unless you feel brave and use the IAR system to transfer it.

Running OpenSim from USB


With Linden Labs pushing out educators there have been an increasing number of blog posts regarding OpenSim. What caught my attention were the guides to running OpenSim from a USB stick, such as the one by Roger Stack. Although very comprehensive and probably the best way of doing things, it's quite complicated, and we should be showing educators how easy it can be.

And so, the easy way:
  1. Go to http://opensimulator.org/wiki/Download
  2. Download the zip file under the 'Binary Packages' heading, and extract it somewhere
  3. In the Bin folder, run OpenSim.exe (OpenSim.32BitLaunch.exe on 64 bit machines)
  4. Eventually you'll be asked for a region name - enter something
  5. For everything else just keep pressing Enter to accept the default settings
  6. Wait until it says: Region (the name you entered) #
That's it. You now have a locally running OpenSim server. Copy the bin folder to any location where you want to run the server from (including a USB stick). Always remember to close the server correctly by typing quit.


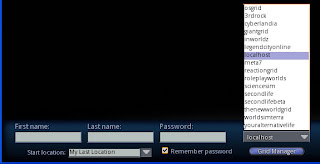
Connecting to the server is also easier than some have described. Don't bother messing around with shortcuts; viewers such as Imprudence and Kirstens allow you to pick 'localhost' from a drop-down list:


Assuming you went along with the default values you can login with first name: Test, last name: User, and leave the password field blank.


Monday, 22 February 2010

Linden Lab's war on games continues

Linden Labs recently over-hauled their forums. I'll ignore the fact that it's broken for now, since they're sure to fix it at some point.

However, the first thing that I noticed was the fact that the games section of the forum has been removed. It's true that it didn't get too much activity, and that might have been their selection criteria when moving between systems, but it certainly doesn't help the gaming community.

Monday, 15 February 2010

Forensic House Update

Just a quick update on the forensics simulation. A bit of surrounding detail has been added to the bedsit environment to add context (see below). The crime scene is now in the basement of the central building.


Shown below is the view when you first walk in; although because of the enclosed nature of the environment you'd actually have to be in 1st person view. There's still a little bit of work to be done to create a more realistic setting.


Various important objects have MCQ quizzes attached; and a feedback board has been added to indicate which quizes were attempted, and whether or not a 100% score was achieved.

Monday, 11 January 2010

Educational tools in OpenSim

My first batch of educational tools for use in OpenSim has been released, and is available at:

http://thoughtfulmonkey.com/eduset/

It's an IAR file, which allows you to load the objects into your inventory without affecting any existing build.

I'll also be adding in some tutorial videos to show how the tools work. The sound is a bit low on the first offering, but you get the idea. If you have any suggestions or problems then feel free to voice them in the comments (it's moderated so they won't appear straight-away).