The instructions in this post will allow you to set-up a loca
l OpenSim grid, for use within an institution's firewall. You can walk into a lab, start the server on one PC, and have the students connect to it through other PCs.
Server setup:
- Download OpenSim and run it once in order to configure it - as described here.
- You will need to use the 'create user' command to create an account for each student.
- Copy the 'bin' folder to a USB stick.
Running the server:
- Plug in the USB stick
- Run OpenSim.exe (OpenSim.32BitLaunch.exe on 64bit machines).
- **Update** In the OpenSim window, type: 'show region regionName'.
- Note down the text that starts with http://
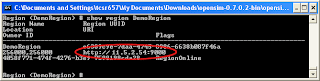
If you've forgotten the name that you gave to your region, then it is shown in brackets within the OpenSim window, i.e. Region (regionName) #
Viewer setup:
- If you already have Second Life viewers installed then skip to the next bit
- Alternatively you can install a viewer on any PC, and then copy the viewer's folder from the 'Program Files' directory (typically on the C drive) onto a USB stick. The just run the executable in this folder.
You (or the students) will need to configure the viewers so that they connect to your server. If the server is run from the same PC each time, then you should only need to do this once.
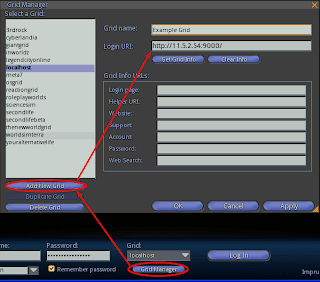
Running the viewer (easy way):
- Viewers such as Imprudence and Hippo include a grid manager where the ip address of the server can be added. Be sure to include 'http://' at the front and ':9000' at the end.
Running the viewer (slightly harder):
- Copy your existing shortcut to the viewer (assuming it's installed - if running from a USB right-click on the exe and choose 'create shortcut').
- Right-click on the new shortcut and choose 'Properties'.
- On the 'Shortcut' tab, look for the 'Target' option.
- At the end of the text in the 'Target' box add: '-loginuri http://11.5.2.54:9000/' where 11.5.2.54 is the ip address of the server.
There is of course a huge variety in networks and institutional setups, but hopefully these steps should work in most cases. You should consider involving your IT or eLearning department when trying to setup OpenSim in this way. They probably won't like running things from USB sticks, but their alternative might be a more robust system.


No comments:
Post a Comment